The
Basics The Stereo Window Practical Help
by
David Lee – david-lee@sbcglobal.net
This paper is intended as a guide for those
who would like to make stereo cards, but are unsure exactly what to do. In order
to make things easier to follow, this paper is divided into 3 sections, so that
the reader can choose the level of involvement that reflects his/her interest
without having to be confused by unwanted information. The first section is
titled The Basics for those who want to know the most elementary
details only. The second section is The Stereo Window for a more
detailed account of trimming and mounting. The third section, titled Practical
Help in Mounting a Stereo Card, tells how to make jigs which assist in
quick and accurate trimming.
The
Basics
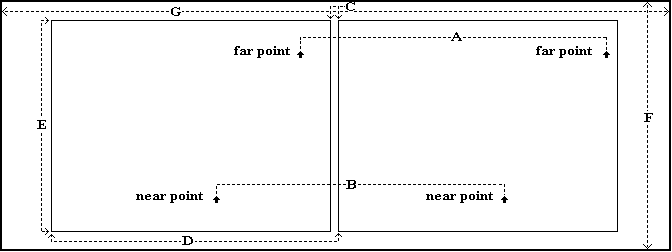
Generally, the size of a Holmes stereo card
is 3½" x 7". On figure 1 these are dimensions F and G respectively.
While the nominal height of the card is 3½", this dimension could range
from less than that to 4" or even more, but it would get progressively more
difficult to see the top if it were more than 4". While the nominal width
of the card is 7", slightly less, say 1/32" to 1/16"
works better because the holder for some viewers is exactly 7" and a
7" card tends to bind. The corners can be left square or they can be cut
round. As for the material, a 4 ply acid-free mat board is preferable. Several
companies make them, including Bainbridge, Crescent, Rising, and Strathmore.
Virtually any color can be found in acid-free board, but I would suggest a color
which is less saturated than the colors in the image, so that it does not draw
ones eye from the image.
The height of the image (E) is generally
about 3", but it could be more or less. If the height of the card (F) were
3½" and the height of the image (E) were 3" this would leave ½"
to be split between I and J. I prefer leaving ¼" for each, but that is an
aesthetic decision.
The space between the two halves (C) varies
between no space for most of the antique cards to about 1/8" or even more
in some cases. One-sixteenth inch seems about right to me.
The width of each half (H) should not be more
than about 3". The exact maximum width , though, is based on the infinity
separation which will be considered in the next section.
Figure
1
The
Stereo Window
The concept of the stereo window is that the
image will appear as if through a window, with everything in the scene behind
the window. In order to understand this concept one must first realize that as
the scene recedes in depth the corresponding points get farther apart. The
corresponding points for the near point of the scene are the closest together,
while the corresponding points for the far point of the scene are the farthest
apart. Therefore it follows that the distance between the edges of the window
(D) should be equal to, or slightly less than, the distance between the near
corresponding points (B). This is the commonly accepted practice with modern
stereo images. The makers of antique cards seem to have had no concern for the
stereo window and consequently it is usually somewhere in the middle depth of
the scene and occasionally at infinity.
As was mentioned in the previous paragraph,
the corresponding points of the far point in the scene (often called the
infinity point) have the greatest separation and the maximum infinity separation
(A) is determined by the lenses of the stereoscope. The maximum infinity
separation for the stereoscopes I measured ranged from 33/8"
to 35/8". Some individuals are able to view images
which have greater infinity separations than that, but the average person will
have trouble. For this reason it is prudent to limit the infinity separation to
33/8" (H).
A final point which may be of interest to the
technically minded, especially those who do not use stereo cameras. The total
deviation (TD) of the image is determined by subtracting the distance between
the near points (B) from the distance between the far points (A). That is A - B
= TD. If TD is too small the scene will appear flat. This would be the case when
using a stereo camera with a distant scene. If TD is too large, there is too
much depth and it will create eye-strain or make the image difficult to view.
For best results TD will probably be in the range of 1/8"
to 3/16".
Practical
Help in Mounting a Stereo Card
After one has made a stereo pair of the right
size it is ready to be trimmed and mounted. The first step is to trim the
bottoms so that the bottom edge is in exactly the same relative position on both
halves. From that the top can be trimmed by measuring an equal distance.
If one is mounting images made from a stereo
camera, such as the Stereo Realist, then trimming the sides need not be an
overly critical matter. The sides can simply be trimmed off evenly.
If you are using a regular camera (or
cameras) then you will have to trim more off the right side of the right image
and the left side of the left image. If you want to be more exacting, you can
follow these instructions for trimming the sides. First trim the right side of
the left image, probably close to the edge, but wherever you want. Next locate
the near point in the scene and measure from it to the edge you just rimmed.
Locate the same point in the right image and trim the right edge the same
distance from the near point as in the left image. Next trim the left edge of
the right image, probably close to the edge. Measure the width of the right
image and trim the left image the same width.
This method works reasonably well for making
several stereo cards, but if you make more than that and you want to do it
accurately and efficiently, then it helps to use jigs. It works well to have
three jigs altogether.
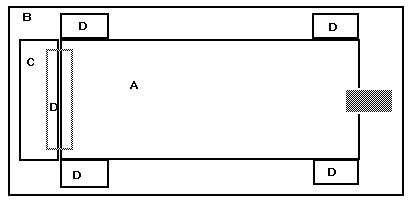
The first jig (see figure 2) is for trimming
the tops and bottoms. Cut a piece of glass or plexiglas 3" high (or
whatever height you have chosen for your images) and about one foot long. Make
sure it is exactly the same height from one end to the other. It is also helpful
to make scored lines along the length of the glass at whatever intervals you
chose, but they must be parallel to the edges. Then cut the glass in half, so
you have 2 pieces about 6 " long (A). Cut pieces of mat board (B) bigger
than the glass and glue a small piece of mat board (C), the height of the glass,
to the bigger piece and tape (D) the glass to it so that the end of the glass
can be lifted and the image placed under it. You should also glue small pieces
of mat board (D) to the bigger piece at the corners of the glass, so that the
glass will not slip. Finally, put a piece of tape at the end of the glass so it
will be easier to lift. To trim the tops and bottoms simply place each image
half under its piece of glass and maneuver them until they are in the same
relative positions with the edges (or the parallel lines) of the glass. With a
razor blade, trim the top and bottom edges carefully.
Figure
2
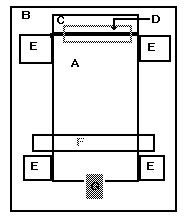
To trim the sides you will need another jig
(see figure 3). Cut a piece of glass (A) about 3" wide (the exact width
will depend on the width your images will normally be, mine are 215/16")
by about 6" long. You will tape (D) it to a piece of mat board (C) in a
similar manner to that of the previous jig, again with reinforcements (E) on the
corners. The major difference is that you need a method of trimming the image
exactly perpendicular to the top and bottom edges. To do this you will glue a
piece of photographic paper (F) in the manner shown in figure 3, making sure the
edge of the photographic paper is exactly perpendicular to the edge of the
glass. To trim the images, place the left one under the glass so that the bottom
is against the photo paper and the right edge is positioned where you want to
trim it. With an ultra fine-point Sharpie pen make a mark at the near point.
Then trim the edges with a razor blade. Next place the right image under the
glass so that its bottom is against the photo paper and its near point is under
the pen mark. Trim the edges. The window will thus be placed at the near point.
Now mount the image. First one must consider
the adhesive. One could use dry mount tissue (recommended for fiber based
prints), glue, or Positionable Mounting Adhesive (by 3M), which I recommend for
RC prints (color or black and white), although it will work for fiber based
paper also The adhesive (except for glue) should be applied before trimming. In
order to position the images you could make pencil marks on the mount or you
could make a jig to help you quickly position it.
Figure
3
In order to make a jig (see figure 4), start
with a piece of mat board (A) about 8" x 10 ". Glue another piece of
mat board (B) about 1½" wide to the right side. Glue another piece (C)
about 2½" wide to the bottom. Glue a 1" piece (D) on top of C and
tape (E) another piece (F) to D. The width of F should be such that it extends
over C exactly ¼" (or whatever amount you have decided to use as the
distance between the bottom of the image and the edge of the card). Finally,
measure from the edge of B exactly 3½" and make marks (G) on either side
of that point 1/32" away from it (or whatever you
choose to be the separation between the 2 halves.
To mount an image, take a piece of card stock
and place it against the edges of C and B and under the edge of F. Determine
which is the left image and which is the right image. Take the left image and
peel off the backing paper (if you are using Positionable Mounting Adhesive) and
place it on the card with the bottom of the image against the edge of F and the
right edge at the left side of G. Do the same with the right image but place it
so that its left edge is at the right side of G. If you are using drymount
tissue you can trim off the top part of A so that the card hangs over the edge
by about ¾". Place one image and hold it in place using a wooden
clothespin. Do the same for a the other half. Place the bottom half of the card
in the drymount press to tack the images in place. Then open the press and put
the card all the way in to adhere it.-

Figure
4